
Posted with permission from https://kaloethina.wordpress.com/
Original post appeared March 2, 2016.
I’ve recently received some requests on how to paint heraldic banners for use outside. I really enjoy painting heraldry on canvas, as I feel it looks more period. (I love silk banners – really, I do, however, silk in period was a luxury, and reserved more for clothes than for something would have whipped around in the wind or thrown on the ground or any number things that just shouldn’t happen to good silk. I might be Byzantine, but I digress.)
Heraldic banners – often a determinant of friend or foe across the field of battle, were also a form of decoration, whether by hanging from the rafters of a great hall or by adding pizzazz to a processional. Additionally, painting canvas in a trompe l’oeil effect was used to great degree during the Field of Cloth of Gold, where the elaborate accommodations (in this case, canvas pavilions), were decorated in and out with lush painting, though these were less heraldically inspired in nature, though it is noted within a folio of designs for the Field of Cloth of Gold, that some pavilions are painted with gold fleur-de-lis on a blue background, an excellent use of heraldry for France.1
The process in period consisted of a ground or gesso layer, followed by the painted layer (usually oils in later SCA-period), similar to other painting preparation processes for wood panels within the Italian and Northern Renaissance.2 Painted fabric, usually linen, was abundantly mentioned, famously in Shakespeare3, – items from clothing to wall-hangings to religious paraments, and as noted withing the diary of Prior More (p84), the cost of painting and sewing cloth for banners.
Lynnyn cloth for ye lyttle hawle at Batnall s d
Item for lynyn cloth for bordurs to ye lyttul parlour
withyn the lyttul hall and ye parlour at Batnall ………………….. 12 0
Item for the peyntyng of ye same to Thomas Peynter …………. 3 4
Item for sowyng of ye honggyng sayes in qe seyd parlours &
for thryd ………………………………………………………… 4
Peyntyng of bordurs. Item payd to Thomas Peynter for
Peynting Ye bordurs in ye lyttal parlour withyn ye lyttul hawle .. 5 4
Item for lynnen for bordurs to peynt for the hall at Grymley …… 2 5
Item for the peyntyng of the same to Thomas Peynter ……….. 2 8
Item for xviii (18) ells of canvas for peynted bordurs to Crowle……. 6 9
Item payd to Thomas Kings for peynting of the bordurs of my
Chamber & ye deyesse (Dais?) at Crowle conteyning xlvi (46)
Yeardes price of every yearde 2d Summa 7/8
Lynnen clotthe. Item payd for xxxvi (36) ells of sultwych for
To make borders to peynt with price the elle 4 ½ d Summa …. 13 6
Item to John Taylor for sowyng the hangyngs with says in
The Lords Chamber at Crowle & the Dessyse in the hall
There with other work ………………………………………… 7 6
Many of the banners and tapestries of this period are of scenes of Biblical subject matter, however, given the use of heraldry in the nobility, it is possible that banners in this style could have been used by nobles on the lower end of the economic scale.
Most banners I make, while painted with completely modern materials for durability and non-to-low-toxicity, still are in the style of medieval banners and painted canvas of the period. The process (for which I would like to thank Mistress Fionnuala inghean Fhearghuis for teaching it to me!) is as follows.
Materials needed:
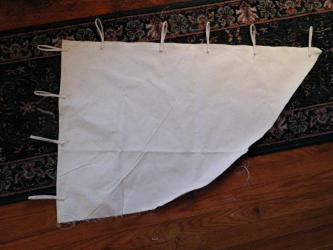
My canvas blank. This will eventually become a Norseman’s weathervane-type banner.
Canvas duck or some other medium-to-heavyweight canvas
Eggshell, satin, or matte exterior latex paint, no colour added (I used eggshell)
Pencil
Sharpie or other permanent marker
Craft acrylic paints (seriously, buy the cheapest paints out there – don’t waste your good acrylic paints for this project. I’ve used Apple Barrel, Folkart, and CraftSmart brands all with good results. For colours: I recommend buying strong heraldic colours for heraldic banners, like bright reds, schoolbus yellow, bright greens, ultramarine blue, medium violet, bright whites, and licorice blacks. It is at this point that you can choose to make details, like shading. A note on blacks and whites – mix a dark charcoal colour, so that shading can still occur on your black charges. Use a light grey a shade or two darker than your white. All other shades can be created by using white or black with your other colours.)
Paint brushes, both foam and traditional (Do not use your good brushes. Canvas is very hard on brushes, and you will need to get into the nooks and crannies of the canvas.)
Clear acrylic sealant spray
Thread and needle or grommets
Optional: projector or someone who help you draw.
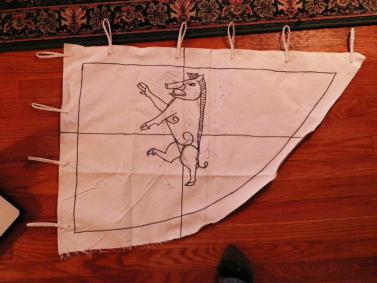 Cut fabric (preferably canvas) in desired size and shape. The fabric can be sewn at one of two points. The first point is here, prior to painting, where it may be easier to ensure the fabric is the right size and shape.The next step is to sketch out your design in pencil, and then when the sketch is complete, go over the lines with a permanent marker. Don’t try to erase your lines – you’ll get eraser gunk all over the canvas, which will cause issues when it comes time to put the base coat down.
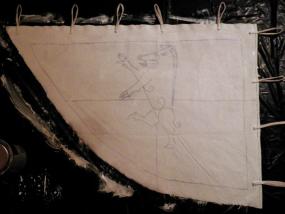 The next step is to take eggshell or matte exterior white latex paint (interior/exterior latex also works, but I usually use paint marked for exterior paint), and paint it over the surface you wish to paint with foam brushes, really making sure to work it into the canvas. This acts as a ground for the subsequent layers, and will make the colours you place over it brighter. This will also make the paint layers more durable. You will be able to see faint marker lines.
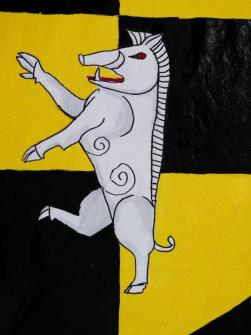
At this point, your canvas is a giant colouring book. Starting with your lightest colours and moving to your darkest, paint your heraldic design with regular craft acrylic paint (I used 95¢ craft paint).5 If you’re shading at this point, add those in at this point to better blend your colours. Mr Pig didn’t get a whole lot of shading, but on later projects, there’s a lot of shading and a lot of blending and a whole lot of diluting paint to make it blend better. It is acrylic paint, after all. Another word to the wise – painting two sides at once will make you crazy. Make sure all paint is dry before even thinking about painting the other side of a two-sided banner. Trust me. TRUST ME.
Once your paint has dried and you are completely done with painting, go over your charges with a permanent marker. This does one of two things: it makes the charge pop, and makes it easier to determine the charge from across a hall or a field.
At this point, you can also sew your banner into its finished shape, though it will be closer to sewing a light leather than the canvas by itself, which is why I prefer doing all of my sewing prior to painting.
 Lastly, you will need to spray your banner with clear spray paint. This further protects the design from the elements, and gives the fabric a nice sheen. It also gives the banner a more finished look.
If you paint your banner, let me know how it turns out! I’d love to see what you’ve accomplished!
Bibliography
2Wescher, H. “Embroiderers and painters of flags.” Ciba Review 77 (1949): 2825-30.
You must be logged in to post a comment.